NTS Nets – NTS Local – NTSOK Winlink – NTSOK Organization – NTSOK Operation – NTSOK Radiogram
Winlink/NTS Presentation Video (2/12/2022) – Mark Kleine N5HZR – Ed Hatch AG5DV – Larry Goodwin W5LHG — Presentation PowerPoint Slide Deck
Installing the software to make operate NTSOK is fairly easy, and is a five-step process. If you have WSJT-X, FLDigi, or any other sound card radio system installed, you should be ready to roll. Your radio will need to provide RX audio over a Windows audio channel and must accept TX audio over a Windows audio channel, and be able to key the transmitter Push To Talk (PTT).
The process is the same for all users of the system. Tactical Email Addresses are only needed by the District Traffic Handlers, Section Traffic Handlers, and Section Traffic Manager.
- Install the Winlink Express client software.
- Install the VARA HF Plugin driver software.
- Verify the VARA HF Operation.
- Backing Up Winlink Information.
- Setting Up Tactical Email Addresses.
Installing Winlink Express
Installing the Winlink Express client software is fairly easy and it can be obtained at the following link https://downloads.winlink.org/User%20Programs/. Download the file that is labeled Winlink_Express_Installation.*.zip. There is also a README_Software_Installation txt file available in this folder, but the current instructions are as follows.
For Winlink Express:

1. Download the complete Winlink Express package. The file is called
Winlink Express Install xxxx.zip, where 'xxxx' is the current version number.

2. Unzip the contents to a directory you can find again, then go to that directory.

3. Run the .msi file to properly install the program. Follow the onscreen directions.

4. Complete documentation is contained in the program's help menu. Refer to the "Setup" section of the help file for detailed configuration information.

From the settings page of the Winlink Express client, you can either log into your existing Winlink account or create a new account.
Winlink Accounts…
…are created with a client program. You can not create one on the https://winlink.org/ website.
They require…
- A valid amateur radio license, or
- a license from a participating government service or agency.
- Ship station, marine or general radiotelephone licenses DO NOT qualify.
- You to use your account. Winlink accounts stay alive only with client program use via radio or telnet connections only; Webmail and other accesses don’t count!. Accounts off-air for 400 days are automatically purged. Use it or loose it!
How To Get an Account
If using Winlink Express, with an internet connection fill out the form presented on the first startup after installation. Be sure to include a password and password recovery email address. Click ‘Update’. Winlink Express makes the process easy. Your account is created!
Fixing Windows Font Size Issue in Winlink Express
Some installations of Winlink Express have an issue where the font size changes from normal size to a very small size after you have sent or received messages. N6KZB has a method to fix this problem and it has worked well with those who have tried it at https://www.winlink.org/content/work_around_windows_10_scale_issue_express
If a Winlink Express pop up window is too small, such as after you post to out box, try this.
- Using Windows File Explorer, locate the RMS Express folder (typically “C:\RMS Express\” and open it up.
- Locate the application RMS Express.exe
- Right-click RMS Express.exe and choose Properties
- Click the Compatibility Tab
- Click Change high DPI settings
- Check the box, Override high DPI Scaling behavior. Scaling performed by:
- In the drop-down box below the check box, find and use, System (Enhanced)
- Click OK
The next time that you start Winlink, the change will be applied and you should not see the font size change anymore.
Installing VARA HF
Installing the VARA HF software is very simple and straightforward. The software is available from the link https://rosmodem.wordpress.com/. As of this writing, the current version is 4.5.9 and is about 4 MB in size, however, you should download the most recent version of the software. In that ZIP file, you will find a single executable file that you need to run as the administrator. You may get a warning that this program is unknown to the Windows system. You can ignore those warnings and continue to install the program. There are no options or details to be modified here.
W4AKH has a great document that walks through all of the functions of the VARA HF software and it can be found at this link https://w4akh.net/docs/7.D.pdf.
Installing VARA FM
Installing the VARA FM software is very simple and straightforward. The software is available from the link https://rosmodem.wordpress.com/. As of this writing, the current version is 4.1.9 and is about 4 MB in size, however, you should download the most recent version of the software. In that ZIP file, you will find a single executable file that you need to run as the administrator. You may get a warning that this program is unknown to the Windows system. You can ignore those warnings and continue to install the program. There are no options or details to be modified here.
K6OLI has a great document that walks through all of the functions of the VARA HF software and it can be found at this link https://drive.google.com/drive/folders/159MCgOY2kinPoVgsUCQK_wV9GSJpLw4z.
Setting up VARA HF
Once the VARA HF software has been installed, you can run the VARA HF program, as shown here.

You will need to use the Settings >> Sound Card selections to properly configure your radio to the VARA HF system.
Here you can also enter the registration key if you have purchased a license for the VARA HF software. Unlicensed versions work identical to the licensed version, except that the unlicensed version is capped at 175 bps. Licensed versions can work up to the full theoretical limit of 8,490 bps. In actual operation, speeds of 300 to 3,000 are typically seen. You can support the programming effort of VARA HF and get the faster speed by sending $69 to the maker by clicking on the upgrade button on this screen. Once you have VARA HF operating, you typically don’t need to run this program unless you change your operating environment. If you run Winlink Express and VARA HF at the same time you will receive a warning message, that can be ignored.
Setting up VARA FM
VARA FM has its own setup program, but the experience is very similar to the VARA HF information listed above.
Backing Up Winlink Information
By default, the Winlink Express program creates a backup daily, and it keeps the backups for 10 days. By selecting Settings and then Backup and restore databases you will see this screen and you can change any of
the settings.
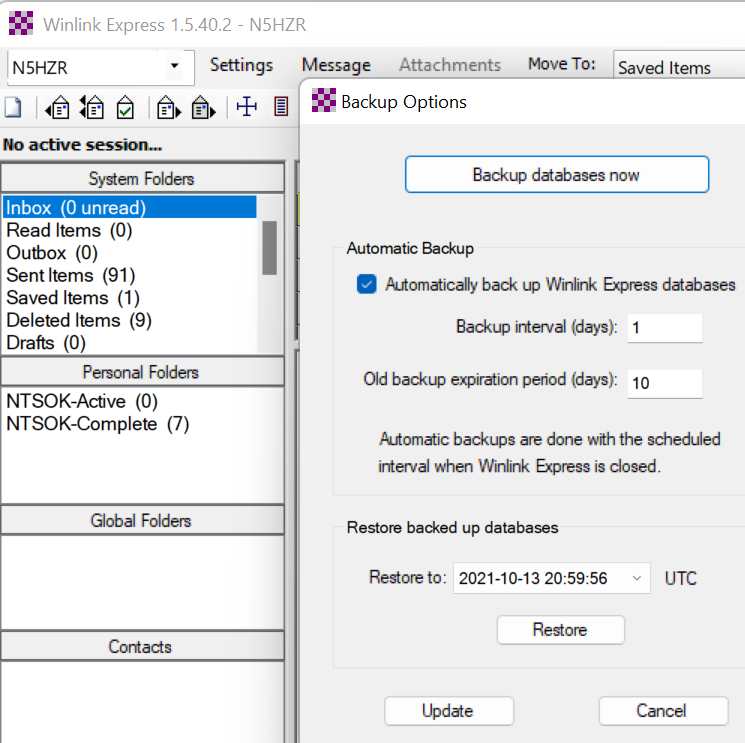
And, to be clear, this function backs up all of the system settings that are held in the Windows system registry. However, the backup files are stored in the Winlink data folder that is on the same disk. By default, this folder is C:\RMS Express. If you are working as an NTSOK traffic handler at any level, you need to make sure that this folder is copied to another system on a frequent and regular basis. Your inbound and outbound messages are stored in that folder. Copy it to a flash drive, OneDrive, DropBox, Google Drive, or some other off-system location.
Setting Up Tactical Email Addresses
The district and section traffic handlers need to add the tactical email addresses to their Winlink Express client. Once a mailbox has been set up on your machine, the Winlink system will check the tactical mailboxes when you check your own mailbox. Note that if you download a message from a tactical mailbox, it will be removed from the Winlink system mailbox. Once you download that message you need to deliver the message to the recipient or forward the message back into the system. If you don’t know where it should go, please forward it to NTSOK.
When you are tasked with monitoring a tactical email address, you will receive the address and the password for this mailbox. Tactical mailboxes are managed by selecting Settings and then Winlink Express Properties. The Auxiliary Callsigns and Tactical Addresses section is shown below circled in red.
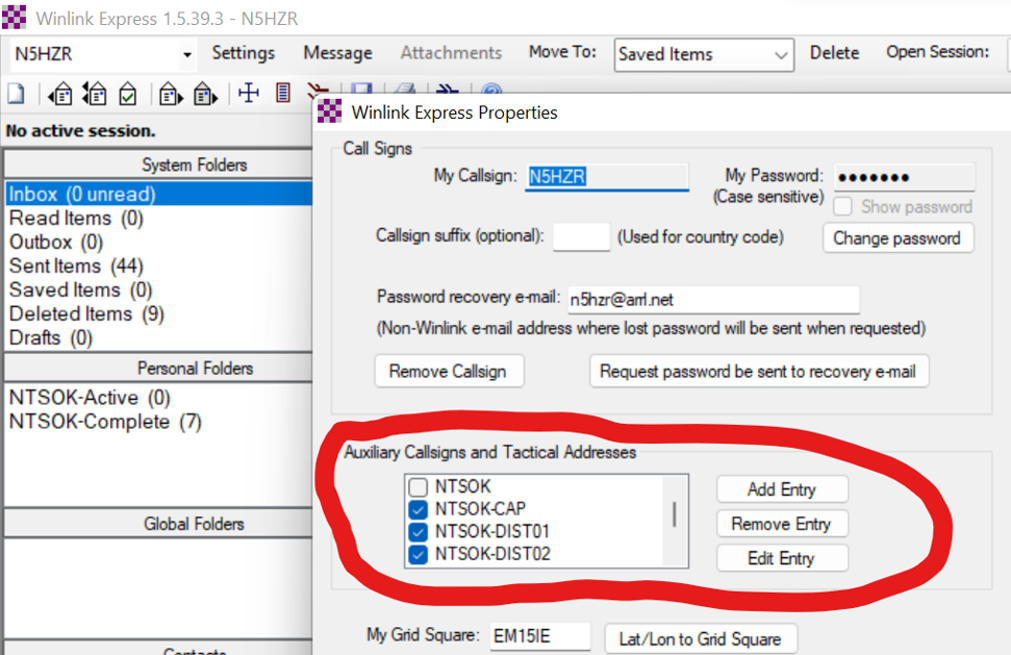
To add a mailbox click the Add Entry button and enter the appropriate mailbox and password on the popup screen. Make sure the Enabled box is selected, and you will receive those messages the next time you check for mail.
If you don’t wish to receive mail for a given tactical email box, click the address, and then click the Edit Entry box. If you deselect the Enabled box and click save, your system will no longer receive email for that box.
Operating VARA HF Sessions (or VARA FM)
The current best practice is to use VARA HF protocol for radio transmissions of Winlink messages. VARA HF allows up to the theoretical speed limit of 8,490 bps. However, there’s more to running VARA HF than max speed. The following list should help you operate an efficient Winlink over VARA HF station.
- By default the setup will try up to 15 times, and then send your callsign via Morse Code.
- The RMS server may be running on a radio that scans between two or more bands. If you can’t raise the station, wait a few minutes and try again.
- The RMS servers may have ‘busy times’ of the day/week. Check the Appendix A of this document to see if your chosen server may be in a busy time.
- When selecting a server to connect to, check Appendix B through G of this document to see what distance your chose band is best suited for. 80/40 are the most reliable over time. 30 and higher tend to appear and disappear with propagation changes.
- Experiment during “good days” with the bands you have available on your system. Find four stations that you can consistently connect to on each band you operate on. During “bad days”, one or more of your chosen stations may be unavailable due to system problems on their end, so multiple paths will let you be successful all the time.
- Rotate the servers in your ‘good list’ to make sure these servers stay available.
- Play “Winlink Limbo” as you check your messages. Turn down the power to see what you can get away with. During “bad days”, the lower power will keep down interference between your station and others in the band near you.
- Watch your audio levels on both TX and RX. TX levels should not cause the ALC to kick in. RX levels should allow signals to decode reliably.
- All signals on all bands should be sent using Upper Side Band (USB).
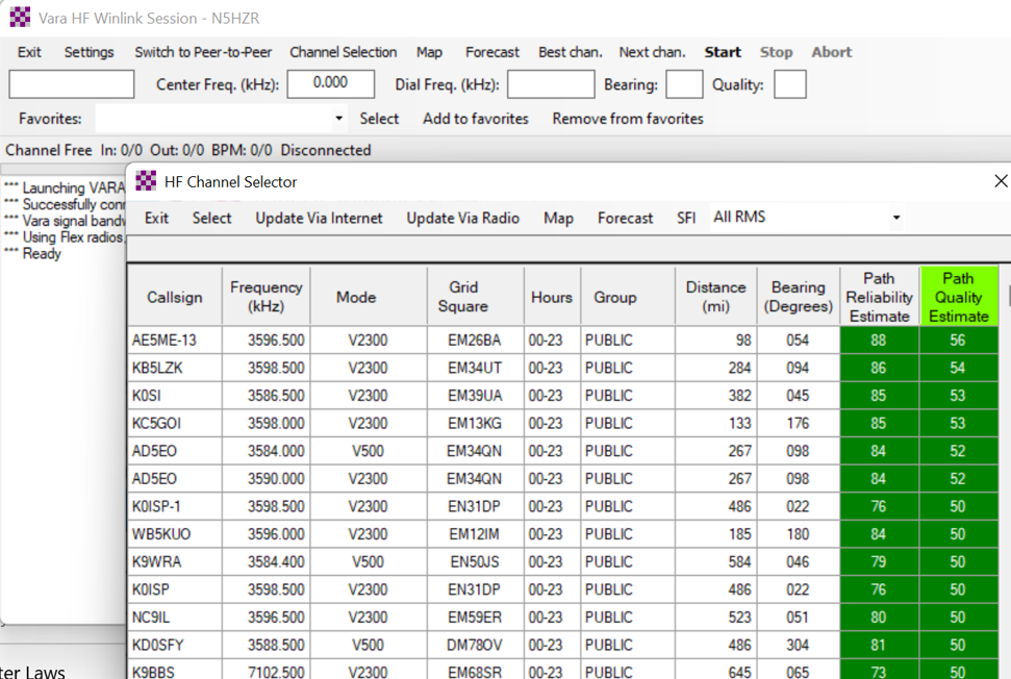
- Clicking on the Forecast button will provide a list of servers that should be best for your location. Selecting the stations at the top of the list would be the best chance for success in your area, as long as you have the proper bands available.